
How to Backstitch on Brother Sewing Machine – it sounds simple, but if you’re just getting started, it can be a little confusing. Perhaps you’re unsure what backstitching is or why it’s essential. Or you’re struggling to find the backstitch button on your Brother machine. Sometimes, even when you press it, nothing happens—or the fabric doesn’t move like it should. You may see thread bunching or skipped stitches, especially with thick or stretchy fabrics. And if you’ve heard about lock stitches, you might wonder if that’s the same thing. No need to worry! This guide will show you everything step by step. You’ll learn how and when to backstitch. This way, you won’t damage your fabric or get stuck.
1. What is Backstitching and Why Is It Important?
Backstitching is a simple yet essential sewing technique. It helps keep your stitches secure. If you have a Brother sewing machine, mastering backstitching can help strengthen your seams and prolong their durability.
What Does Backstitching Do?
Backstitching is done at the start and finish of sewing. It stops the thread from coming undone. It sews reinforcement stitches by sewing in reverse for a few seconds, then forward again.
Why Backstitching Prevents Your Seams from Falling Apart
Without backstitching, your stitch can easily come undone. Putting reinforcement at the beginning and end of each seam keeps your fabric strong even after many washes and wears.
Common Myths About Backstitching (And the Truth)
Some beginners think it’s optional or only necessary for large projects. In truth, even 3 to 5 stitches in reverse can make a big difference in the durability of your sewing.
2. When Should You Use Backstitching in Sewing?
Knowing when to backstitch can make your sewing neat and professional. You don’t need to backstitch every time, but using it in the right spots is key.
Best Times to Backstitch While Sewing a Seam
Use reinforcement stitches at the starting point and when you reach the end of sewing a seam. This holds the fabric and thread in place, especially on seams that will get stressed.
When You Shouldn’t Use a Backstitch (And Why)
Don’t use backstitching on delicate or transparent fabric. It can leave visible stitch marks or harm the material. In such cases, a lock stitch or tying off by hand is safer.
How Many Stitches Are Enough When Backstitching?
Sew in reverse for about 3 to 5 stitches. That’s usually enough reinforcement unless the fabric is thick or the seam is under heavy strain.
3. Tools You Need Before You Start (Especially for Brother Machines)
Before you backstitch on a Brother sewing machine, ensure you have the right tools and setup. This will help you have a smooth experience.
Must-Have Tools for Backstitching Success
Brother sewing machine (any basic model with a reverse-stitch function)
Thread matching your fabric.
Needle suitable for your fabric type.
Fabric scraps to practise
Choosing the Right Needle and Thread for Your Fabric
Depending on the stitch and fabric type, select the right needle. For thick fabric, use a heavy-duty needle. For stretchy or knit fabrics, use a ballpoint needle. The correct thread prevents breakage when you reverse.
Preparing Your Brother Sewing Machine for Backstitching
Thread your machine properly and set your stitch pattern (usually straight). Use the foot controller or press the start button, depending on your model. Make sure your presser foot is down before you start sewing.
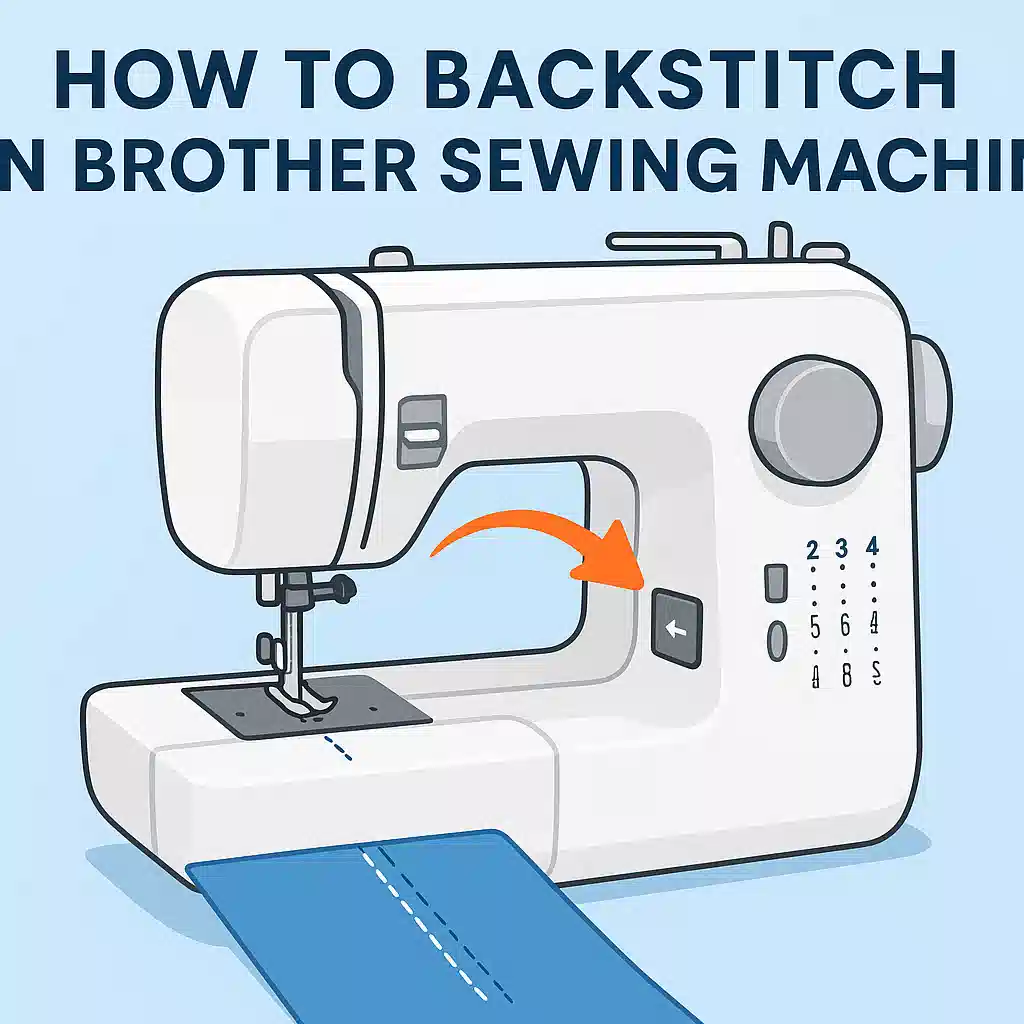
4. How to Find the Backstitch Button on a Brother Sewing Machine
The backstitch button or reverse lever changes with each Brother model. However, it’s simple to find if you know where to look.
Where Is the Reverse Stitch Button on Brother Machines?
On most Brother machines, the reverse stitch button is a small button with a U-turn arrow. It’s usually located near the nail area, above the foot.
How to Identify the Backstitch Symbol or Icon
Look for a curved arrow pointing backwards or down. On some machines, it may be labelled as “reverse” or a reverse stitch symbol.
Brother Models That Have an Automatic Reverse Function
Some new Brother models let you turn on automatic reinforcement stitches. This feature sews reinforcement stitches at the start and end by itself.
5. Step-by-Step Guide: How to Backstitch on a Brother Sewing Machine
Now let’s go through exactly how to sew a backstitch with a Brother sewing machine, step by step.
Step 1: Set Up Your Fabric and Thread
Place your fabric under the needle. Lower the presser foot and hold the thread tails behind the foot for the first few stitches.
Step 2: Position the Needle and Lower the Presser Foot
Use the foot pedal or press the start button to sew forward 3 to 5 stitches.
Step 3: Press and Hold the Reverse Button
Now, press the reverse stitch button or pull the reverse lever. Your machine will sew in reverse.
Step 4: Stitch Forward Again to Lock the Seam
Release the reverse button and continue sewing forward. This creates strong reinforcement at the beginning of your stitch.
Pro Tip: Practice on Scrap Fabric First
If you’re unsure, use a piece of scrap fabric to practice your stitch pattern and learn how to press the reverse. Refer to the video included in your machine’s manual for visual assistance.
6. Troubleshooting: Why Your Backstitch Isn’t Working
At times, your reverse stitch may fail to function correctly. Here are some common issues and their solutions.
Backstitch Button Doesn’t Respond: What to Check
Ensure that someone threads the machine correctly.
Check if the reverse lever or button is stuck
Confirm that the foot pedal is plugged in
Thread Bunching or Skipped Stitches During Backstitch
Adjust your tension setting.
Check the stitch length dial.
Try changing the needle.
Fabric Not Moving in Reverse: Common Causes and Fixes
If the fabric stays in place while pressing the reverse, your feed dogs may be down. Raise them using your model’s manual.
Machine Is Making Noise or Jamming While Reversing
Stop immediately. Remove the fabric and thread. Re-thread the upper thread and bobbin, then continue sewing.
7. Dealing with Thick, Stretchy, or Delicate Fabrics
Different types of fabric need special care while using the reverse function. Here’s how to adjust.
Why Backstitching Thick Fabric Can Be Tricky
Thick fabric can jam the needle or cause uneven stitches. Use a stronger needle and a walking foot if available.
How to Avoid Damaging Stretchy or Sheer Materials
Stretch fabric may stretch too much when sewn in reverse. Use a stabiliser and stretch needle. For sheer fabric, do not backstitch; instead, tie the thread by hand.
Needle and Stitch Adjustments for Difficult Fabrics
Use a longer stitch length for thicker fabric and a shorter one for delicate fabrics. Avoid zigzag or decorative stitches unless necessary.
Use of Stabilizers and Specialty Presser Feet
A stabiliser helps prevent puckering. A non-stick foot can help when sewing sticky or slippery materials.
8. Backstitch vs. Lock Stitch: What’s the Difference?
Backstitching and lock stitches both serve to secure seams, but they work differently.
What Is a Lock Stitch and How Is It Different?
A lock stitch is a reinforcement method. It secures the thread by sewing it in place, not by sewing backward. It’s automatic on some machines.
When to Use Lock Stitch Instead of Backstitch
Use lock stitch for delicate fabrics or when you want a cleaner finish without extra stitches showing.
Do Brother Machines Offer Both Features?
Yes, many brother models include both reverse seam and locking button. Check your manual to see if your selected seam allows this plant.
Conclusion:
Learning how to backstitch on a Brother sewing machine can genuinely improve your sewing experience, especially when you want your seams to last. Whether you’re working on a simple straight line or selecting a stitch for a more complex project, using reinforcement stitches at the beginning and end is a small step with a significant impact.
Always remember to switch to the correct stitching function before sewing and ensure you’ve selected the stitch that best suits your fabric type and project needs. If your Brother model allows it, you can even turn on the automatic reinforcement option to save time and effort.
Practicing the right direction of stitching—sewing forward, then in reverse—helps you learn when and how to add stitches to reinforce your work. The more you sew, the more confident you’ll become at selecting a stitch and knowing when to use the reverse stitch feature.
With these simple tips and steps, you’re now ready to backstitch like a pro—and enjoy a smoother, stronger sewing journey.
Frequantly Ask Question
Q2: How to hand stitch backstitch?
Start with a small stitch forward, then bring the needle up behind the last stitch and go down in front of it. Repeat to create strong, overlapping stitches.
Q1: Do all sewing machines have a reverse?
No, not all sewing machines have a reverse function. Most modern machines do, but some older or basic models may not.